
What a Junior React Developer Does
A junior React developer builds and maintains user-facing features for websites and web applications using React, JavaScript, HTML, and CSS. The word junior does not mean the work is unimportant or limited to simple tasks. It usually means the developer is still gaining professional experience and receives guidance from more experienced engineers.
In a typical role, a junior React developer turns designs and product requirements into interactive interface components. For example, they might create a navigation menu, build a registration form, display data from an API, or fix a layout that does not work correctly on mobile devices. Their work contributes directly to the part of an application that users see and interact with.
Common responsibilities
The exact responsibilities vary by company, but junior React developers often:
- Build reusable components with JSX, props, and state
- Add interactivity through event handlers and React Hooks
- Connect interfaces to APIs and display returned data
- Style pages for desktop, tablet, and mobile screens
- Identify and fix bugs in existing components
- Write or update basic tests
- Use Git to manage code changes
- Participate in code reviews, planning meetings, and team discussions
- Follow accessibility and performance guidelines
- Update technical documentation when necessary
Junior developers rarely work in isolation. They commonly collaborate with UI and UX designers, back-end developers, quality assurance specialists, product managers, and other front-end engineers. A designer may provide a mockup, for instance, while a back-end developer supplies an API. The React developer’s job is to turn those inputs into a functional, reliable interface.
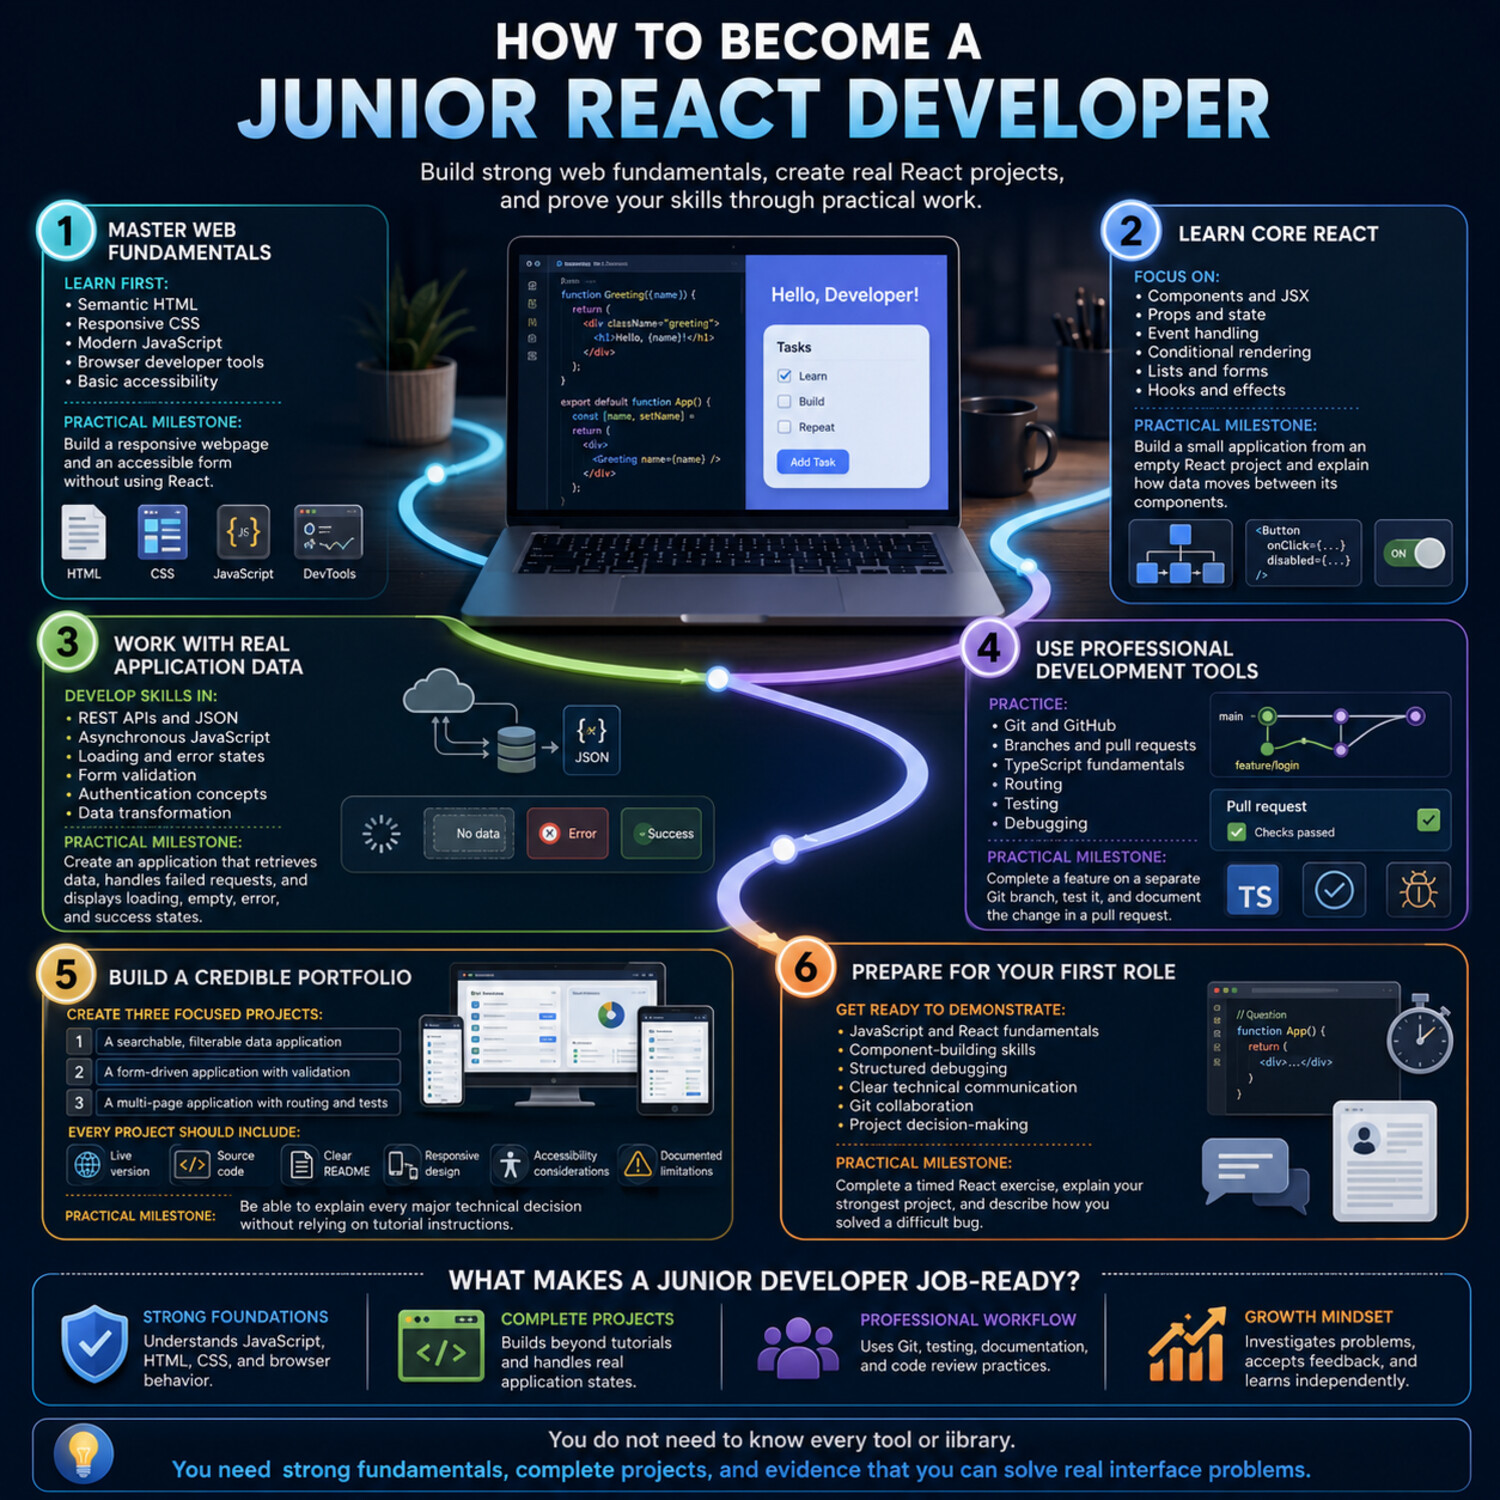
React development versus general front-end development
React is only one part of front-end development. A strong junior candidate must understand the web platform beneath the library.
HTML provides the page structure, CSS controls presentation and layout, and JavaScript handles logic and behavior. React helps developers organize interfaces into components and update the page efficiently as application data changes. It does not replace the need to understand semantic markup, responsive design, accessibility, browser behavior, or core JavaScript concepts.
This distinction matters during both project work and interviews. Memorizing React syntax may help you reproduce a tutorial, but it is not enough to diagnose a broken request, choose the correct HTML element, or explain why a component is rendering unexpectedly.
What employers generally expect
Most employers do not expect a junior developer to know every React feature or solve every technical problem independently. They do expect a dependable foundation and evidence that the candidate can learn effectively.
A job-ready junior React developer should be able to:
- Build a small application without copying every step from a tutorial.
- Break an interface into clear, reusable components.
- Work with props, state, forms, events, and API data.
- Read error messages and debug common problems.
- Explain important decisions in their own code.
- Ask focused questions after attempting to investigate an issue.
- Accept feedback and revise their work carefully.
Professional habits are also important. Clear communication, realistic progress updates, readable code, and thoughtful questions make collaboration easier. You do not need to pretend to know something you have not learned. A more credible approach is to explain what you understand, describe how you would investigate the problem, and use documentation or team guidance appropriately.
The goal of an entry-level role is not to arrive as a finished expert. It is to contribute useful work while developing the technical judgment, independence, and collaboration skills required for more advanced responsibilities.
Learn the Web Development Fundamentals First
React becomes much easier to understand when you already know how the browser handles structure, styling, and behavior. Before focusing heavily on components and Hooks, build a dependable foundation in HTML, CSS, and JavaScript. These technologies are not separate from React—they are the tools you use inside nearly every React application.
A common mistake is to begin with React before learning enough JavaScript. This can make basic problems feel like React problems when they are actually caused by unfamiliarity with arrays, objects, functions, or asynchronous code. Learning the fundamentals first helps you debug more confidently and understand what your code is doing instead of relying on memorized patterns.
Start with semantic HTML and accessibility
HTML defines the meaning and structure of a page. Learn how to use headings, paragraphs, links, buttons, forms, lists, images, and page regions correctly.
Semantic HTML means choosing elements based on their purpose rather than their appearance. For example, an action should usually use a <button> instead of a clickable <div>. A button has built-in keyboard behavior and communicates its purpose more clearly to browsers and assistive technologies.
Practice building:
- A well-structured article page
- A navigation menu
- A contact or registration form
- A product or profile card
- A page with a header, main content area, sidebar, and footer
Pay attention to form labels, image alternative text, heading order, and keyboard navigation. Accessibility is easier to maintain when it is part of the initial structure rather than an afterthought.
Learn practical CSS, not just visual styling
A junior React developer should be able to turn a design into a responsive interface. This requires more than changing colors and font sizes.
Focus on:
- The box model, including margin, padding, borders, and sizing
- CSS specificity, inheritance, and the cascade
- Flexbox and CSS Grid
- Responsive layouts and media queries
- Relative units such as
rem,%,vw, andvh - Positioning and stacking order
- Reusable class naming and organized styles
- Visible focus states and readable color contrast
Build layouts that work at different screen sizes instead of targeting one desktop width. Use browser developer tools to inspect elements, test responsive breakpoints, and identify which CSS rule is affecting a component.
You do not need to master every CSS feature before learning React. You should, however, be able to create a clean page from a reference design and diagnose common layout problems without depending entirely on a component library.
Develop a strong JavaScript foundation
JavaScript is the most important prerequisite for React. React components, state updates, event handlers, and data transformations all depend on standard JavaScript concepts.
Make sure you understand:
- Variables and data types: strings, numbers, booleans, arrays, objects,
null, andundefined. - Functions: declarations, expressions, arrow functions, parameters, return values, and scope.
- Arrays and objects: reading, updating, copying, filtering, mapping, and destructuring data.
- Control flow: conditionals, loops, logical operators, and optional chaining.
- Modules: exporting and importing code between files.
- Asynchronous JavaScript: promises,
asyncandawait, API requests, and error handling. - The DOM and events: how browsers represent pages and respond to user actions.
Array methods such as map, filter, find, and reduce are especially useful in React applications. For example, you may use map to render a list of products, filter to display matching search results, or find to select one record by its identifier.
Practice these concepts with small browser-based projects. A task manager, expense list, quiz, weather interface using an API, or searchable product catalog can help you connect individual JavaScript skills to realistic user interactions.
Become comfortable with essential development tools
Professional front-end work involves more than writing code. Learn the basic tools used to create, inspect, track, and share projects.
You should be able to:
- Navigate folders and run common commands in a terminal
- Install project dependencies with a package manager
- Create a Git repository and make clear commits
- Work with branches and resolve simple merge conflicts
- Push code to GitHub or a similar hosting service
- Inspect network requests, console errors, and page elements in browser developer tools
- Read project documentation and follow setup instructions
Git is particularly important because teams use it to coordinate changes and review work. Start with a simple workflow: create a branch, make a focused change, review the difference, commit it with a clear message, and merge it after checking that the project still works.
Know when you are ready to learn React
You do not need perfect knowledge of the web platform before moving forward. You are ready to begin React when you can build a small interactive page with HTML, CSS, and JavaScript and explain how the main parts work.
A useful readiness test is to create an application that:
- Accepts user input
- Stores and updates a list of items
- Renders data dynamically
- Filters or sorts that data
- Responds to button and form events
- Saves or retrieves information from an API or browser storage
- Works on both desktop and mobile screens
Once you can complete most of that project with limited guidance, React will give you a more organized way to build similar interfaces. The goal is not to delay React indefinitely. It is to learn enough of the underlying web technologies that React feels like a useful tool rather than a collection of unfamiliar rules.
Master the React Skills Employers Look For
Once you understand HTML, CSS, and JavaScript, your next step is learning how React organizes interactive interfaces. Focus on the concepts that appear repeatedly in real applications rather than trying to memorize every API or library.
A capable junior React developer should be able to build an application from components, manage changing data, handle user input, communicate with an external API, and explain how information moves through the interface. The goal is not simply to make the page work. Your code should also be understandable, maintainable, and reasonably easy to test.
Understand components, JSX, and props
React applications are built from components: reusable pieces of interface that combine structure, behavior, and presentation. A component might represent a search bar, profile card, navigation menu, form field, or entire page.
Start by learning how to:
- Write function components
- Use JSX to describe interface structure
- Pass information through props
- Render components conditionally
- Display arrays of data with stable keys
- Compose small components into larger features
Good component design requires judgment. A component should usually have a clear purpose, but breaking every heading, button, or line of text into a separate file can make a project harder to follow. Extract a component when it is reused, contains meaningful behavior, or makes a larger feature easier to understand.
Props should be treated as inputs from a parent component. A child component should not directly change the props it receives. Instead, the parent can pass a callback that allows the child to request an update.
Learn state and event handling
State represents information that can change while the application is running. Examples include the contents of a form, the selected tab, whether a menu is open, or a list of items returned by an API.
The useState Hook is the usual starting point for local component state. Practice using it with:
- Text inputs and checkboxes
- Counters and toggle controls
- Modal windows and dropdown menus
- Filters and search fields
- Lists that users can add to, update, or remove from
React state should be updated rather than mutated directly. When working with arrays or objects, create an updated value using techniques such as the spread syntax, map, or filter. This makes state changes more predictable and helps React recognize when the interface needs to update.
Event handling is closely connected to state. Learn to respond to clicks, form submissions, keyboard input, and field changes. Keep handlers focused and use descriptive names such as handleSubmit, handleDelete, or handleSearchChange.
Use effects carefully
The useEffect Hook is commonly misunderstood. It is designed to synchronize a component with something outside React, such as a network request, browser event, timer, or third-party tool. It is not the default solution for every calculation or state change.
Before adding an effect, ask whether the value can be calculated directly from existing props or state. For example, a filtered product list usually does not need to be stored in separate state. It can often be derived during rendering from the original list and the current filter.
When an effect is appropriate, understand:
- How its dependency list controls when it runs
- How to clean up subscriptions, timers, or event listeners
- How to avoid unnecessary or repeated requests
- How to prevent outdated asynchronous results from affecting the interface
- Why development behavior may reveal effects that are not written safely
Learning to use effects selectively is more valuable than adding them whenever two values need to stay related.
Build forms and validate user input
Forms are common in React projects and provide a useful way to practice state, events, conditional rendering, and accessibility.
You should be comfortable building controlled form fields, handling submission, and displaying clear validation messages. A well-designed form should preserve user input when appropriate, associate labels with controls, and explain errors in specific language.
For a small form, local state may be enough. Larger forms may benefit from a dedicated form library, but learn the underlying concepts first. A library can reduce repetitive code, yet you still need to understand validation, submission states, error handling, and accessible feedback.
Remember that front-end validation improves the user experience but does not replace validation on the server.
Work with APIs and asynchronous data
Many React applications retrieve information from a server. Practice requesting data, displaying it, and handling the full range of possible outcomes.
A reliable data-driven component should account for at least four states:
- Loading: The request has started but has not completed.
- Success: The application received valid data.
- Empty: The request succeeded, but there is nothing to display.
- Error: The request failed or returned an unusable response.
Do not assume every request will succeed. Check response status, handle exceptions, and provide useful feedback without exposing technical details that do not help the user. Also consider what happens if the user leaves the page, changes a search term quickly, or retries the request.
For larger projects, data-fetching libraries can help manage caching, synchronization, retries, and request state. However, a junior developer should first understand the basic request lifecycle and be able to implement it clearly.
Add routing and shared state when needed
Client-side routing allows a React application to display different pages without requesting an entirely new document for every navigation. Learn how to create routes, navigation links, dynamic URL parameters, and a fallback page for unknown paths.
You should also understand the difference between:
- Local state, used by one component or a small part of the interface
- Lifted state, moved to a shared parent so multiple children can use it
- Context, useful for values needed across a wider component tree
- External state tools, which may help when state becomes complex or widely shared
Do not introduce a state-management library simply because it is popular. Begin with local state and component composition. Add more structure when the application has a clear problem that simpler patterns do not solve well.
Write code that is accessible, testable, and maintainable
A feature is not complete merely because it looks correct on your screen. Users should be able to operate it with a keyboard, understand its controls, and receive useful feedback when something changes or fails.
Continue using semantic HTML inside React components. Use real buttons for actions, associate form fields with labels, preserve visible focus indicators, and test important interactions without a mouse.
Develop basic testing skills as well. Junior developers are often expected to understand how to verify that a component:
- Renders the correct information
- Responds to user actions
- Handles loading and error states
- Submits or updates data correctly
- Shows or hides content under the right conditions
Prioritize tests that reflect user behavior rather than internal implementation details. This makes tests more useful when the component is refactored.
Finally, keep components readable. Use descriptive names, remove unused code, handle errors intentionally, and avoid abstractions that make a simple feature difficult to trace. A strong junior React developer is not the person who uses the most advanced pattern. It is the person who can choose a clear solution, explain it, test it, and improve it after receiving feedback.
Follow a Practical React Learning Roadmap
Learning React is more manageable when you follow a clear sequence instead of jumping between unrelated tutorials, libraries, and project ideas. A useful roadmap should build skills in stages, give you regular opportunities to practice, and move you gradually from guided exercises to independent development.
There is no single schedule that works for everyone. Your progress will depend on your JavaScript foundation, available study time, and previous programming experience. Rather than measuring success only by weeks or months, use practical milestones: what you can build, explain, debug, and improve without step-by-step instructions.
Stage 1: Strengthen JavaScript through small projects
Before making React your main focus, confirm that you can use modern JavaScript in realistic situations. Practice working with arrays, objects, functions, modules, promises, and API responses.
Useful projects at this stage include:
- A searchable list
- A task manager
- A form with validation
- A quiz with score tracking
- A small application that retrieves data from a public API
Do not worry about creating a large portfolio project yet. The purpose of this stage is to become comfortable with the logic that React applications rely on.
Stage 2: Learn React’s core mental model
Begin with components, JSX, props, state, event handling, and conditional rendering. Build several small interfaces rather than one complicated application.
For example, create a counter, accordion, product filter, shopping list, or multi-step form. These exercises may appear simple, but they help you understand how data flows through components and how state changes update the interface.
At this stage, practice answering questions such as:
- Which component should own this state?
- Can this value be calculated instead of stored?
- Should this interface be split into smaller components?
- What information should be passed through props?
- What should happen when the user performs an action?
Being able to explain these decisions is more valuable than memorizing component code.
Stage 3: Build a complete data-driven application
Once the fundamentals feel familiar, combine them in a larger project. Your application should include multiple pages or views, API integration, forms, loading and error states, responsive styling, and reusable components.
Good project ideas include an event planner, recipe organizer, book tracker, personal finance dashboard, or inventory interface. Choose a topic that gives you enough features to demonstrate skill without requiring a highly complex back end.
Develop the project in small increments:
- Define the main user problem.
- Sketch the pages and component structure.
- Build the static interface.
- Add state and user interactions.
- Connect the application to data.
- Handle errors, empty results, and loading states.
- Test important workflows.
- Improve accessibility and mobile behavior.
- Refactor unclear or repeated code.
- Document how to run and use the project.
This process is closer to real development than completing a tutorial in one continuous pass.
Stage 4: Add TypeScript and testing
After you can build a React application with JavaScript, begin learning TypeScript. TypeScript can help identify incorrect assumptions about data before they become runtime errors, but it is most useful when you already understand the JavaScript it builds on.
Start by typing:
- Component props
- Form events
- State values
- API response objects
- Reusable functions
- Optional and nullable data
Avoid using overly broad types simply to silence errors. The goal is to describe your data accurately and make the code easier to understand.
Learn basic component testing at roughly the same stage. Focus on user-visible behavior: entering text, submitting forms, opening menus, displaying API results, and showing error messages. You do not need to test every implementation detail. Prioritize the workflows that would cause meaningful problems if they stopped working.
Stage 5: Explore the wider React ecosystem selectively
Once your core skills are stable, you can begin exploring frameworks and supporting libraries. Depending on the types of roles you are targeting, useful topics may include:
- A React framework for routing, rendering, and application structure
- A form-management library
- A server-state or data-fetching library
- A component library or styling system
- More advanced testing tools
- Authentication concepts
- Basic deployment and monitoring
Learn these tools to solve specific problems, not simply to expand a list of technologies on your résumé. Libraries change over time, but the ability to read documentation, evaluate tradeoffs, and understand underlying concepts remains useful.
Combine documentation, tutorials, and independent practice
Each learning resource serves a different purpose. Tutorials can introduce unfamiliar concepts, documentation provides authoritative explanations and examples, and independent projects reveal whether you can apply the knowledge.
A productive learning cycle looks like this:
- Read or watch a focused explanation.
- Reproduce the example to understand the mechanics.
- Close the resource and rebuild the feature from memory.
- Change the requirements or add a new feature.
- Debug the problems you encounter.
- Compare your solution with reliable documentation.
- Write down what you learned in your own words.
This approach turns passive exposure into active practice.
Avoid getting stuck in “tutorial hell”
Tutorial hell describes the pattern of completing course after course without becoming comfortable building independently. Tutorials are useful, but they can create a false sense of progress when every decision has already been made for you.
To move beyond this stage, begin changing tutorial projects. Replace the data source, redesign the interface, add a feature that was not demonstrated, or rebuild the application around a different use case. When you get stuck, define the problem precisely and research that specific issue instead of immediately finding another full-length course.
Use a sustainable weekly routine
Consistency is usually more useful than occasional long study sessions. A balanced week might include:
- Two sessions focused on learning or reviewing concepts
- Two sessions dedicated to project development
- One session for debugging, testing, and refactoring
- One short review of notes, documentation, and completed work
Adjust the schedule to your circumstances, but keep project work at the center. Track completed features, problems solved, and concepts you can now explain rather than counting only videos watched or hours studied.
A strong roadmap does not require you to learn everything before applying for junior roles. It should help you reach the point where you can build a complete React application, discuss your decisions honestly, use documentation effectively, and continue learning when the requirements change.
Build a Portfolio That Demonstrates Job-Ready Skills
A portfolio gives employers concrete evidence of how you approach front-end development. For a junior React developer, a few complete, well-explained projects are usually more informative than a long list of unfinished experiments. Each project should show that you can identify a user need, organize an interface, manage data, handle common failure states, and deliver a usable application.
Your portfolio does not need to imitate a senior developer’s body of work. It should accurately represent your current abilities while making your strongest skills easy to evaluate.
Choose projects that demonstrate different abilities
Avoid building several projects with nearly identical features. A collection of simple task lists may show repetition, but it gives reviewers limited information about how you handle new requirements.
A balanced portfolio might include:
- A polished interface project that demonstrates semantic HTML, responsive CSS, accessibility, and reusable components.
- A data-driven application that retrieves information from an API and handles loading, errors, empty results, filtering, and search.
- A more complete product-style application with multiple views, forms, shared state, routing, validation, and persistent data.
Useful project ideas include an event planner, recipe organizer, reading tracker, support dashboard, appointment interface, inventory tool, or personal finance organizer. The topic matters less than the quality of the implementation and the clarity of the problem being solved.
Choose a scope that you can finish. A smaller application with thoughtful details is more credible than an ambitious platform with broken pages, incomplete features, or unclear setup instructions.
Build around a real user problem
Before writing code, define who the application is for and what that person needs to accomplish. This prevents the project from becoming a random collection of features.
For example, instead of describing a project as “a React movie app,” define its purpose more precisely:
The application helps users search for movies, save titles to a watchlist, filter saved items by status, and review basic details before choosing what to watch.
That description gives you a practical basis for deciding which features belong in the project. It also makes the application easier to explain in an interview.
For each portfolio project, be prepared to discuss:
- The problem you chose to solve
- The primary user workflow
- The project’s main technical requirements
- The decisions you made about components and state
- Problems you encountered and how you investigated them
- Improvements you would make with additional time
This context helps reviewers understand your reasoning, not just the final screen.
Include features that reflect real front-end work
A strong project should demonstrate more than the ability to render static content. Depending on the application, consider including:
- Responsive layouts for mobile and desktop screens
- Accessible navigation, forms, and interactive controls
- Client-side routing
- API requests with clear loading and error states
- Search, sorting, filtering, or pagination
- Form validation and submission feedback
- Reusable components
- Persistent data through an API or browser storage
- Authentication flows when appropriate to the project
- Basic tests for important user interactions
- Helpful empty states and confirmation messages
Do not add features solely to make the project appear complex. Every feature should support the application’s purpose. Unnecessary libraries and elaborate abstractions can make a small project harder to understand without improving the user experience.
Show thoughtful handling of edge cases
Portfolio projects often work well under ideal conditions but fail when data is missing, a request takes longer than expected, or a user enters unexpected information. Addressing these situations shows practical development awareness.
Test what happens when:
- An API request fails
- A search returns no results
- A form contains invalid or incomplete input
- A list contains many items
- Optional data is missing
- A user submits a form twice
- The application is opened on a small screen
- A page URL does not match an existing route
You do not need to account for every theoretical scenario. Focus on the conditions that are reasonably likely within the project’s main workflows.
Make the source code easy to review
A reviewer may spend only a limited amount of time examining a repository, so organize it carefully. Use clear file names, consistent formatting, focused components, and understandable commit messages.
Before publishing a project, remove:
- Unused files and imports
- Large blocks of commented-out code
- Console messages added during debugging
- Placeholder text that was never updated
- Secrets, private credentials, or sensitive configuration
- Dependencies the application no longer uses
Keep configuration instructions accurate. A reviewer should be able to understand how the project is organized and, when appropriate, run it without guessing which steps are required.
Avoid presenting copied tutorial code as original work. Using tutorials for learning is reasonable, but portfolio projects should include substantial independent decisions. Change the design, data model, user flow, or feature set, and make sure you can explain every important part of the implementation.
Write a useful README
A README is part of the project, not an optional extra. It gives you an opportunity to demonstrate technical communication and explain work that may not be obvious from the interface.
A helpful README should include:
- A concise project overview
- The user problem and main features
- The technologies used
- Setup and run instructions
- A link to the deployed application
- Screenshots when they improve understanding
- Testing instructions, if tests are included
- Important technical decisions
- Known limitations
- Planned improvements
Be specific when describing your decisions. Instead of writing, “I used React because it is popular,” explain how components, state, or routing supported the application’s requirements.
Known limitations can strengthen a README when they are presented honestly. For example, you might note that data is stored only in the browser, the API has request limits, or the current version does not support account recovery. This shows that you understand the boundaries of your implementation.
Deploy and test every project
Each major portfolio project should have a working live version whenever deployment is practical. A live application allows reviewers to experience the interface without setting up the code locally.
After deployment, test the application from the beginning as though you were a first-time visitor. Check that:
- Navigation and direct page URLs work
- API requests succeed in the deployed environment
- Environment variables are configured correctly
- The interface works on mobile and desktop
- Forms provide understandable feedback
- Links to the repository and live application are correct
- Refreshing a nested route does not break the application
- The browser console does not show avoidable errors
Deployment should not be treated as the final click after development. It is part of delivering software and may reveal configuration, routing, or network issues that were not visible locally.
Present the portfolio clearly
Your portfolio website should make the projects easy to find and evaluate. It does not need complicated animation or a highly experimental design. Prioritize readability, accessibility, performance, and straightforward navigation.
For each featured project, provide:
- A clear title and one-sentence description
- A screenshot or meaningful preview
- The main technologies used
- A link to the live application
- A link to the source repository
- A brief explanation of your contribution and key decisions
Only claim work you completed yourself. For team projects, describe your individual responsibilities accurately and acknowledge the collaboration.
Review and update the portfolio as your skills improve. Replace early exercises with stronger work, repair broken links, update outdated dependencies when appropriate, and revise project descriptions so they reflect what you actually learned. A focused portfolio should tell a clear story: you can build useful React interfaces, finish what you start, communicate your decisions, and improve your work through testing and feedback.
Gain Experience Before Your First Full-Time Role
Professional experience does not begin only after you receive a full-time job offer. You can develop many of the same habits—working from requirements, using version control, responding to feedback, and maintaining existing code—through smaller projects and collaborative opportunities.
The key is to choose experiences that require more than following instructions. Look for work that introduces real constraints, such as unclear requirements, unfamiliar code, deadlines, user feedback, or collaboration with another developer. These situations help you practice the judgment and communication expected in a junior React role.
Contribute to open-source projects
Open-source work can introduce you to established codebases and team workflows. You may learn how maintainers organize issues, review pull requests, document changes, and protect project quality.
Start with a project you can understand and run locally. Before changing code:
- Read the contribution guidelines.
- Follow the setup instructions.
- Explore the project structure.
- Run the application and available tests.
- Review recently merged pull requests.
- Choose a clearly defined issue that matches your current skill level.
Your first contribution does not need to add a major feature. Useful beginner contributions may include fixing documentation, improving an error message, adding a missing test, correcting an accessibility issue, or resolving a small interface bug.
Avoid submitting large changes without discussing them first. If an issue is unclear, ask a focused question that shows what you have already investigated. Maintainers are more likely to respond productively when they can see that you have read the available information and attempted to understand the problem.
Open-source participation is not a requirement for becoming a React developer, and project activity varies. Treat it as one possible way to practice collaboration rather than a guaranteed path to employment.
Look for internships and structured learning opportunities
Internships, apprenticeships, and supervised project programs can provide experience with development processes that are difficult to recreate alone. Depending on the organization, you may work with tickets, design files, code reviews, testing requirements, and regular team meetings.
When evaluating an opportunity, look for signs that the work includes:
- Clear responsibilities
- Access to technical guidance
- Opportunities to write or review code
- A defined project or learning plan
- Feedback from experienced developers
- Reasonable expectations for an entry-level contributor
Be cautious about roles that provide little information about the work, require substantial unpaid production labor without meaningful supervision, or expect junior applicants to perform several advanced roles independently. A useful learning experience should give you a realistic opportunity to develop skills, not simply transfer business risk to an inexperienced contributor.
During an internship, keep notes about the problems you solve, tools you use, and feedback you receive. Do not copy private code or confidential business information into your portfolio. Instead, describe your contribution at an appropriate level, such as improving a form workflow, writing component tests, or helping implement a responsive page.
Build a project for a real user
A project becomes more realistic when someone other than you depends on it. You might build a small application for a community group, student organization, local club, or professional contact. The user does not need to be a paying client for the experience to be valuable.
Begin by defining the project carefully:
- What problem needs to be solved?
- Who will use the application?
- Which features are essential?
- Who will provide content and feedback?
- How will the project be hosted and maintained?
- What is outside the agreed scope?
Keep the first version small. A registration form, searchable resource directory, event page, or internal tracking interface may provide more useful experience than an ambitious platform that cannot be maintained.
Confirm requirements in writing, even for informal projects. A brief summary can prevent misunderstandings and give you something concrete to build against. After presenting a draft, ask users to complete the main workflow while you observe where they become confused.
Real-user projects also teach an important lesson: the technically most interesting solution is not always the most appropriate one. Reliability, accessibility, ease of use, and maintainability may matter more than adding another library or advanced feature.
Create realistic team experience with other developers
Solo projects are useful, but they do not teach every collaboration skill. Working with one or two other learners can help you practice dividing tasks, reviewing code, resolving disagreements, and integrating changes.
Treat the project like a small professional workflow:
- Define the project goals and main user stories.
- Create issues for specific pieces of work.
- Assign clear owners while sharing important context.
- Use separate Git branches.
- Open pull requests rather than committing everything directly to the main branch.
- Review changes before merging.
- Document decisions that affect the whole project.
- Hold brief progress check-ins.
A code review should examine more than formatting. Check whether the change meets the requirement, handles expected errors, preserves accessibility, and remains understandable to another developer.
When leaving feedback, explain the reason behind the suggestion. Instead of writing, “Change this,” you might write, “Could we use a button here? It provides the expected keyboard behavior and better communicates that this element performs an action.”
Do not avoid disagreements, but keep them focused on the project. Compare the options against requirements, maintainability, user needs, and available evidence rather than personal preference.
Practice working in an unfamiliar codebase
Junior developers are rarely hired only to build new applications from an empty folder. Much of the work may involve reading existing code, fixing defects, and adding features without disrupting established behavior.
You can practice this skill by:
- Revisiting a project you have not opened for several months
- Adding a feature to another learner’s application
- Refactoring a tutorial project you did not originally design
- Contributing to an open-source repository
- Rebuilding one part of an older project while preserving its interface
Before editing unfamiliar code, trace the relevant user flow. Identify where data enters the application, which components use it, how state changes, and where errors are handled. Make one focused change at a time and test the surrounding behavior.
This approach is more effective than immediately rewriting code you dislike. Existing choices may reflect requirements you have not yet discovered.
Use freelance-style practice carefully
Small freelance projects can provide useful experience, but they also introduce responsibilities beyond coding. You may need to clarify requirements, manage expectations, communicate progress, and support the delivered work.
Before accepting a project, make sure the scope matches your current abilities. Be honest about what you can deliver and avoid promising features you have not investigated. Define the expected pages, functions, review process, and completion criteria clearly.
For practice, you can simulate a client project without presenting it as paid experience. Ask someone to act as the stakeholder, provide requirements, request revisions, and evaluate the finished application. This creates realistic constraints while allowing you to focus on learning.
When describing freelance or simulated work in a résumé or interview, label it accurately. Distinguish among paid client work, volunteer work, personal projects, and practice exercises. Honest descriptions are more credible than inflated job titles.
Network through genuine participation
Networking is most useful when it grows from repeated, constructive interaction. Developer communities, meetups, conferences, online forums, and study groups can help you learn how others solve problems and discover opportunities that may not appear through broad job searches.
You do not need to approach every conversation by asking for a referral. Instead:
- Ask thoughtful technical questions.
- Share a lesson from a recent project.
- Offer useful feedback when you have relevant knowledge.
- Attend consistently rather than appearing only during a job search.
- Follow up with people when there is a clear reason to continue the conversation.
A useful introduction might briefly explain what you are learning, what you are building, and the type of feedback you are seeking. This gives the other person something specific to respond to.
Be respectful of people’s time. A focused request—such as feedback on one project description or one technical decision—is easier to answer than a broad request to review your entire career plan.
Document your experience in a credible way
After completing any project or contribution, record what you actually did. This makes it easier to update your résumé, portfolio, and interview notes later.
For each experience, write down:
- The problem or requirement
- Your specific responsibilities
- The tools and technologies used
- The decisions you influenced
- A challenge you encountered
- How you tested or verified the result
- Feedback you received
- What you would improve next
Focus on actions and outcomes you can explain. For example, “Built reusable React components for a responsive event directory and added filtering by date and category” is more informative than “Worked on a cutting-edge platform.”
Experience becomes valuable when you can connect it to professional skills. A volunteer project may demonstrate requirements gathering. An open-source fix may show codebase navigation. A team application may provide examples of pull requests and review feedback.
You do not need to wait for permission to begin practicing professional development habits. By working with real requirements, other contributors, and existing code, you can build evidence that you are prepared to learn and contribute within a React development team.
Prepare for Junior React Developer Applications and Interviews
A successful job search requires more than sending the same résumé to every opening. Employers need to understand what you can build, how you solve problems, and whether your current skills match the work described in the role.
For junior React positions, applications are strongest when they present clear evidence: completed projects, readable code, thoughtful technical decisions, and an honest explanation of your experience. You do not need to meet every item in a job description, but you should understand the role’s main requirements and be prepared to discuss the skills you claim.
Create a focused résumé
Your résumé should make your relevant experience easy to identify. Keep the emphasis on front-end development, React projects, technical skills, and transferable work that demonstrates communication, problem-solving, or collaboration.
A clear junior developer résumé often includes:
- A brief professional summary
- Technical skills grouped by category
- Selected React and front-end projects
- Relevant work, internship, volunteer, or open-source experience
- Education, training, or certifications when applicable
- Links to your portfolio and code repositories
Avoid listing every technology you have encountered. Include tools you can discuss and use with reasonable confidence. If you completed one introductory exercise with a library, that does not necessarily mean it belongs in your primary skills section.
Project descriptions should explain what you built and what you contributed. Instead of writing, “Created a React website,” use a more specific description:
Built a responsive event-planning application with React and TypeScript, including form validation, client-side routing, reusable components, and filtered API data.
When possible, describe the problem solved, the main features, and your technical responsibility. Do not invent metrics or imply that a personal project had real users, revenue, or business results unless you can support those claims.
Make your portfolio and GitHub profile easy to review
A recruiter or engineer should be able to move from your résumé to your best work without searching through outdated repositories.
Pin a small number of strong projects on your GitHub profile. Each featured repository should include:
- A descriptive name
- A useful README
- Clear setup instructions
- A link to the deployed application
- Organized source code
- A reasonable commit history
- No exposed credentials or private information
Your contribution graph is less important than the quality of the work you present. A large number of minor commits does not automatically demonstrate stronger ability. Focus on maintaining projects that you can explain in detail.
Before applying, open every portfolio and repository link in a private browser window. This helps you catch broken deployments, missing permissions, incorrect URLs, and setup instructions that depend on files stored only on your computer.
Read job descriptions carefully
Job titles are not standardized. One company’s junior React role may focus on building interface components, while another may include testing, design implementation, API integration, or work within a full-stack framework.
Separate the requirements into three categories:
- Core requirements: Skills central to the daily work, such as JavaScript, React, HTML, CSS, Git, and API integration.
- Supporting skills: Tools that strengthen your fit, such as TypeScript, testing, routing, or a specific styling approach.
- Preferred experience: Technologies or industry knowledge that may be helpful but are not always essential.
Apply judgment rather than using a rigid percentage rule. You may still be a reasonable candidate when you meet the core requirements but have not used every preferred library. However, a role that expects independent system design, extensive production ownership, or several years of advanced experience may not offer the support normally associated with a junior position.
Look for descriptions of the actual work, team structure, onboarding process, and opportunities for feedback. These details can be more informative than a long list of tools.
Tailor each application
Tailoring does not mean rewriting your entire résumé for every opening. It means emphasizing the most relevant evidence.
For example, if a role highlights responsive design and accessibility, place a project demonstrating those skills near the top. If it emphasizes TypeScript and testing, mention where you used typed API data, component tests, or form validation.
Use the employer’s terminology when it accurately describes your experience, but do not copy phrases that overstate your ability. Your application should remain consistent with your portfolio and interview answers.
A short cover letter or application response can address:
- Why the role is relevant to your goals
- Which experience best matches the work
- What you contributed to a related project
- Why the organization or product interests you
Keep the focus on evidence. General statements such as “I am passionate, hardworking, and a fast learner” are more persuasive when supported by a specific example.
Prepare to explain your projects
Project discussion is often central to junior developer interviews. Interviewers may use your work to evaluate technical knowledge, decision-making, communication, and ownership.
Choose two or three projects and prepare to explain:
- What problem the application solves
- Why you selected the technologies
- How you divided the interface into components
- Where state is stored and why
- How data moves through the application
- How you handled loading, error, and empty states
- What you tested
- Which problem was hardest to debug
- What you would change in a future version
Avoid memorizing a speech word for word. Instead, practice explaining the project at several levels: a 30-second overview, a two-minute summary, and a detailed technical walkthrough.
Be ready to open the source code and locate an important feature. You should understand the main files, not just the visible result. If part of the project came from a tutorial, library example, or teammate, describe that honestly and explain your own contribution.
Review common JavaScript and React topics
Technical interviews vary, but junior candidates are commonly asked to reason about core concepts rather than obscure framework details.
Review JavaScript topics such as:
- Scope and closures
- Arrays and objects
- Equality and type coercion
- Destructuring and spread syntax
- Array methods
- Promises and asynchronous code
- Modules
- Event handling
- Immutability
- Basic DOM behavior
For React, be prepared to discuss:
- Components, JSX, and props
- Local state
- Controlled forms
- Conditional rendering
- List rendering and keys
- Lifting state
- Hooks and dependency lists
- API requests
- Routing
- Context
- Component composition
- Common causes of unnecessary or incorrect renders
Understanding matters more than reciting definitions. For example, if asked about state, explain what it represents, where you would place it, and why directly mutating it can cause problems.
Practice coding and debugging aloud
A coding interview may involve writing a function, building a small interface, reviewing existing code, or fixing a bug. The interviewer is often evaluating your process as well as the final result.
Use a structured approach:
- Restate the problem in your own words.
- Clarify the expected input, output, and edge cases.
- Describe a simple solution before writing code.
- Implement one part at a time.
- Test the normal case.
- Check empty, invalid, or unexpected inputs.
- Explain possible improvements.
For a React exercise, begin by identifying the data, interactions, and component responsibilities. Avoid introducing extra libraries unless they solve a clear requirement.
When debugging, gather evidence before changing code. Read the error, reproduce the issue, inspect the relevant values, and narrow down where the behavior changes. Random edits may occasionally fix a problem, but they do not demonstrate a dependable process.
Thinking aloud does not mean speaking continuously. It means explaining important decisions, assumptions, and discoveries so the interviewer can follow your reasoning.
Prepare for behavioral questions
Junior developers work within teams, so interviews often include questions about feedback, communication, priorities, mistakes, and unfamiliar tasks.
Prepare examples of times when you:
- Solved a difficult technical problem
- Learned a new tool to complete a project
- Received critical feedback
- Disagreed with a teammate
- Made a mistake and corrected it
- Managed competing tasks
- Asked for help effectively
- Improved a project after testing it
Use a clear structure: describe the situation, your responsibility, the actions you took, and the result or lesson. Choose real examples from employment, school, volunteer work, open-source contributions, or collaborative projects.
Do not present every outcome as perfect. A credible answer can include what went wrong and how you adjusted your approach.
Ask useful questions during the interview
An interview is also an opportunity to understand whether the role offers appropriate expectations and support.
Useful questions include:
- What kinds of tasks are usually assigned to a new junior developer?
- How are code reviews handled?
- Who provides technical guidance?
- How is work planned and prioritized?
- What does onboarding look like?
- How does the team approach testing and accessibility?
- Which skills would help someone succeed during the first few months?
- How is feedback shared within the team?
Listen for specific answers. A clear explanation of onboarding, collaboration, and responsibilities can help you evaluate the working environment more effectively than broad claims about company culture.
Follow up and improve your process
After an interview, record the questions you were asked, where you felt confident, and which topics need more practice. Do not rely on memory several weeks later.
A brief follow-up message can thank the interviewer, confirm your interest, and mention one relevant point from the conversation. Keep it professional and concise.
Not every application will lead to an interview, and not every interview will produce an offer. Avoid treating each rejection as proof that you are unqualified. Hiring decisions may depend on factors you cannot see. Focus on the parts you can improve: clearer project descriptions, stronger technical explanations, better examples, and more consistent application habits.
The objective is not to appear flawless. A strong junior candidate demonstrates a reliable foundation, honest self-awareness, and the ability to approach unfamiliar problems carefully. When your résumé, portfolio, and interview answers all support the same picture of your skills, employers can evaluate your potential with greater confidence.
Create a Sustainable Plan for Landing and Succeeding in Your First Role
Becoming a junior React developer is not a single finish line. The process usually includes learning, building projects, applying for roles, receiving feedback, and improving your skills over time. A sustainable plan helps you make steady progress without relying on unrealistic deadlines or trying to master every tool at once.
The most useful plan is one you can follow consistently. It should account for your available time, current skill level, and other responsibilities while keeping your effort focused on activities that produce evidence of growth.
Set practical milestones instead of fixed promises
It is difficult to predict exactly when someone will receive a job offer. Hiring conditions, location, experience, application quality, and employer needs all affect the process. For that reason, avoid setting goals such as “become employed within 30 days” or assuming that completing one course will guarantee a role.
Use milestones you can control, such as:
- Complete and deploy a full React application
- Add tests to an important user workflow
- Improve a project’s accessibility and mobile layout
- Submit a specific number of thoughtful applications each week
- Practice explaining one project without notes
- Review one unfamiliar codebase
- Complete several mock interview exercises
- Ask for targeted feedback on a résumé or portfolio
These goals make progress visible even when hiring decisions take longer than expected.
Review your milestones regularly. If you are applying often but receiving few responses, examine your résumé, portfolio presentation, and job targeting. If you are reaching interviews but struggling with technical questions, adjust your study time toward JavaScript, React fundamentals, debugging, or project explanations.
Balance learning, building, and applying
Some developers postpone applications because they feel they need to learn one more library. Others apply continuously without improving the evidence they present. A stronger approach combines both activities.
A weekly routine might include:
- Skill development: Review one focused topic, such as asynchronous JavaScript, React forms, testing, or TypeScript.
- Project improvement: Add or refine a feature that demonstrates practical ability.
- Application work: Identify suitable roles and tailor your résumé or project examples.
- Interview practice: Work through technical and behavioral questions.
- Professional participation: Join a meetup, contribute to a discussion, or request specific feedback.
The exact schedule can vary. The important point is to keep building while you apply. New project improvements give you stronger examples to discuss, and interview questions often reveal which topics deserve more practice.
Avoid changing your learning path every time you see a new job description. Employers use different tools, and no single candidate will match every listing. Strengthen the core skills that transfer across roles, then learn additional technologies when they are relevant to the opportunities you are pursuing.
Track useful information
A simple spreadsheet, document, or task board can help you manage the job search. Record:
- Company and role
- Application date
- Source of the opening
- Main required skills
- Résumé version used
- Current application status
- Interview dates
- Questions asked
- Follow-up actions
- Lessons from the process
Tracking applications prevents duplicate submissions and makes patterns easier to recognize. For example, you may notice that roles emphasizing accessible interfaces respond more often when you feature a related project.
Also keep a technical learning log. Write down bugs you solved, concepts you reviewed, feedback you received, and decisions you made. These notes can later become interview examples and help you see progress that is easy to overlook.
Do not collect data simply for the sake of having a detailed system. Track only information that helps you make better decisions.
Use feedback productively
Feedback may come from code reviews, portfolio reviews, interviews, project users, or rejected applications. Not all feedback will be equally useful, and different people may offer conflicting advice.
Evaluate feedback by asking:
- Is it specific?
- Does it identify a clear problem?
- Does it relate to the type of role I am targeting?
- Can I verify it through documentation, testing, or repeated observations?
- Would acting on it improve clarity, usability, or technical quality?
For example, “Your portfolio needs work” is difficult to apply. “The live demo link is hard to find, and the README does not explain how API errors are handled” gives you a clear next step.
Avoid rebuilding your entire portfolio after every opinion. Look for repeated themes. If several reviewers struggle to understand your project descriptions, that is a stronger signal than one person disliking your design style.
When receiving technical feedback, focus on the reasoning behind it. A suggested code change may solve the immediate issue, but understanding why it improves maintainability, accessibility, or performance is what helps you make better decisions later.
Manage rejection without losing direction
Rejection is a normal part of a competitive hiring process, but repeated rejection can make it difficult to evaluate your progress objectively. Separate the outcome from the information available.
Sometimes you will receive useful feedback. In other cases, an employer may provide no explanation. Do not invent a reason when you do not have evidence. Hiring decisions may involve experience level, internal changes, candidate availability, technical fit, or many other factors.
After each interview, perform a brief review:
- Which questions did I answer clearly?
- Where did I become uncertain?
- Did I explain my reasoning?
- Which project example was most effective?
- What should I review before the next interview?
- Did the role appear appropriate for a junior developer?
Turn one or two observations into specific actions. For example, you might practice describing state management, improve your explanation of an API error, or add a missing test to a portfolio project.
Avoid responding to rejection by applying indiscriminately to every technical role. Maintain reasonable criteria so your effort remains focused on positions where your skills and the employer’s expectations have meaningful overlap.
Prepare for the transition into a professional team
Receiving an offer is the beginning of a new learning stage. Your first role will likely introduce unfamiliar code, tools, business rules, and team conventions. You are not expected to understand the entire system immediately, but you should approach the learning process carefully.
During onboarding:
- Read the available documentation before asking broad questions.
- Set up the project and record any unclear steps.
- Learn how work is assigned, reviewed, tested, and released.
- Identify where the team communicates decisions.
- Ask which parts of the codebase are most important for your initial tasks.
- Confirm expectations when a requirement is ambiguous.
- Take notes on terminology, systems, and recurring processes.
Do not try to memorize everything during the first few days. Build a personal reference of commands, links, architecture notes, and common workflows.
When given your first task, restate the expected outcome and confirm how completion will be evaluated. A small bug fix may involve more than changing one line; it could require a test, documentation update, design review, or verification in several browsers.
Ask effective technical questions
Asking questions is part of professional development. The goal is not to avoid questions, but to make them focused and useful.
Before asking for help:
- Reproduce the problem.
- Read the error message carefully.
- Check relevant documentation.
- Inspect the data and code path.
- Try one or two reasonable approaches.
- Record what happened.
Then explain:
- What you are trying to accomplish
- What you expected
- What actually happened
- What you investigated
- Where you are uncertain
For example, “The API request is failing” provides little context. A stronger question would explain that the request succeeds locally but returns an authorization error in the deployed environment, list the configuration already checked, and ask whether the team uses a different environment variable setup.
Do not spend excessive time blocked simply to prove independence. Teams differ in how quickly they expect developers to ask for help, so learn the local norm. Good judgment means investigating first while also recognizing when another person’s context can prevent wasted effort.
Treat code reviews as a learning tool
Code review is not only a quality-control step. It is one of the main ways junior developers learn a team’s standards and technical reasoning.
Before requesting review:
- Read your own changes from beginning to end.
- Remove temporary code and debugging messages.
- Run the relevant tests and checks.
- Verify the feature manually.
- Keep the change focused.
- Explain what the change does and how it was tested.
- Note any tradeoffs or unresolved questions.
When receiving comments, avoid treating every suggestion as criticism. Reviewers may be pointing out a team convention, hidden requirement, edge case, or simpler implementation.
If you do not understand a comment, ask for the reasoning rather than making a change mechanically. If you disagree, explain your thinking respectfully and refer to requirements or evidence. The goal is a better solution, not winning the discussion.
Over time, look for patterns in review feedback. Repeated comments about naming, tests, component structure, or error handling indicate areas where you can improve proactively.
Continue developing beyond React syntax
After you begin working professionally, your growth should extend beyond learning more Hooks or libraries. Strong front-end developers gradually develop a broader understanding of how software is designed, delivered, and maintained.
Useful areas for continued development include:
- Advanced JavaScript and TypeScript
- Accessibility testing
- Component and integration testing
- Browser performance
- HTTP and API behavior
- Authentication and authorization concepts
- Design systems
- Build and deployment processes
- Observability and error monitoring
- Security fundamentals for front-end applications
- Basic system design
- Product and user-experience thinking
Choose topics based on the work you encounter. If your team maintains complex forms, improve your understanding of validation and accessibility. If the application handles large amounts of data, learn about request management, rendering performance, and pagination.
Do not rush to collect advanced topics without using them. Depth develops through repeated application, feedback, and reflection.
Build a reputation for reliability
In a first role, reliability is often more valuable than appearing unusually advanced. A reliable junior developer:
- Communicates when a task is blocked
- Gives realistic progress updates
- Tests changes before requesting review
- Documents important findings
- Responds thoughtfully to feedback
- Admits uncertainty instead of guessing
- Follows through on agreed actions
- Raises risks early
- Treats users and teammates with respect
You will make mistakes. What matters is how you respond: identify the impact, communicate clearly, help correct the issue, and learn from the cause.
Becoming a junior React developer is not about reaching a point where you no longer need help. It is about developing enough technical foundation and professional judgment to contribute responsibly while continuing to learn. A sustainable plan keeps that process focused—from your first independent project through your first months as a working developer.
Conclusion
Becoming a junior React developer requires more than learning component syntax. Start with a strong foundation in HTML, CSS, and JavaScript, then practice React by building complete applications that solve clear user problems. Along the way, develop the professional skills that support good technical work: debugging carefully, using Git, writing readable code, testing important workflows, communicating clearly, and responding constructively to feedback.
You do not need to master the entire React ecosystem before applying for entry-level roles. Focus on building a small number of polished projects, understanding your own technical decisions, and improving the areas that appear repeatedly in job descriptions and interviews.
Choose one practical next step—finish a project feature, improve a README, practice a technical explanation, or submit a well-targeted application. Consistent, evidence-based progress will prepare you to contribute responsibly in your first React role and continue growing after you are hired.